-
Table view cell 구성iOS/UIKit 2022. 7. 8. 23:19
Table view cell을 위한 클래스 생성
이번에는 헤더와는 달리 오직 코드만으로 cell을 만들어보자. 우선
UITableViewCell을 상속받는 클래스를 생성한다.class AccountSummaryCell: UITableViewCell { override init(style: UITableViewCell.CellStyle, reuseIdentifier: String?) { super.init(style: style, reuseIdentifier: reuseIdentifier) setup() layout() } required init?(coder: NSCoder) { fatalError("init(coder:) has not been implemented") } } extension AccountSummaryCell { private func setup() { } private func layout() { } }각 셀의 레이아웃은 다음과 같다.
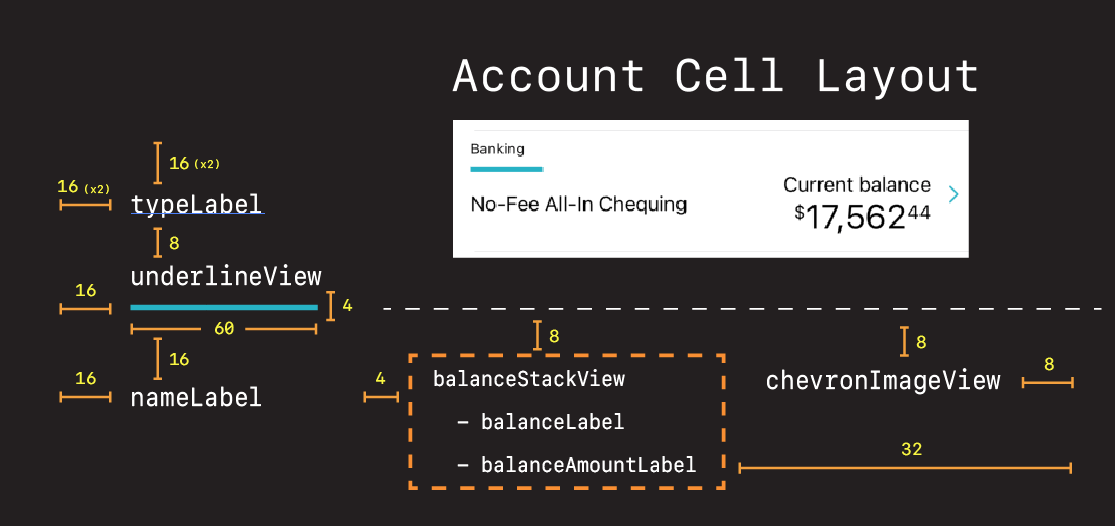
typeLabel 추가
먼저
typeLabel을 추가하자.typeLabel프로퍼티와, cell의 id역할을 하는reuseID, cell의 높이를 설정하기 위한rowHeight도 추가한다.class AccountSummaryCell: UITableViewCell { let typeLabel = UILabel() static let reuseID = "AcoountSummaryCell" static let rowHeight: CGFloat = 100 // ... }그 다음
typeLabel에 대한 스타일과 레이아웃을 설정한다.extension AccountSummaryCell { private func setup() { typeLabel.translatesAutoresizingMaskIntoConstraints = false typeLabel.font = UIFont.preferredFont(forTextStyle: .caption1) typeLabel.adjustsFontForContentSizeCategory = false typeLabel.text = "Account Type" // table view cell의 경우 contentView에 sub view들을 넣어야 함 contentView.addSubview(typeLabel) } private func layout() { NSLayoutConstraint.activate([ typeLabel.topAnchor.constraint(equalToSystemSpacingBelow: topAnchor, multiplier: 2), typeLabel.leadingAnchor.constraint(equalToSystemSpacingAfter: leadingAnchor, multiplier: 2) ]) } }그 다음 table view를 가지는 view controller에서 cell을 register한다.
extension AccountSummaryViewController {
    // ...
    private func setupTableView() {
        // ...

        tableView.register(AccountSummaryCell.self, forCellReuseIdentifier: AccountSummaryCell.reuseID)
        tableView.rowHeight = AccountSummaryCell.rowHeight
        tableView.tableFooterView = UIView()

        tableView.translatesAutoresizingMaskIntoConstraints = false
        // ...
    }

    // ...
}
이 상태에서 실행하면 각 cell의 높이만 바뀌고 기본 cell이 보여지는 것은 똑같다.
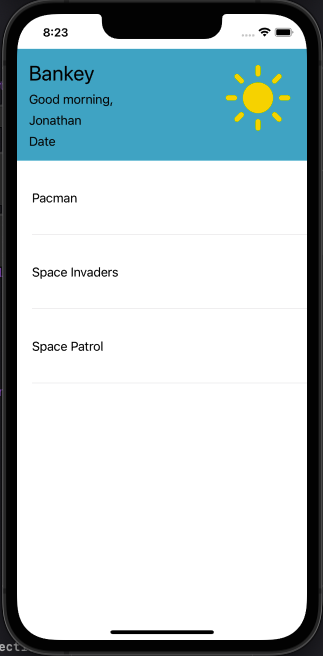
이는
UITableViewDataSource를 따르기 위한 extension의 메서드에서 기본UITableViewCell을 반환하기 때문이다.extension AccountSummaryViewController: UITableViewDataSource { func tableView(_ tableView: UITableView, cellForRowAt indexPath: IndexPath) -> UITableViewCell { let cell = UITableViewCell() cell.textLabel?.text = games[indexPath.row] return cell } // ... }다음과 같이 바꿔주면 된다.
tableView.register에서reuseID를 가지고AccountSummaryCell을 등록했기 때문에, 여기에서는reuseID를 사용하여AccountSummaryCell을 생성하여 넣도록 할 수 있는 것이다.func tableView(_ tableView: UITableView, cellForRowAt indexPath: IndexPath) -> UITableViewCell { let cell = tableView.dequeueReusableCell(withIdentifier: AccountSummaryCell.reuseID, for: indexPath) as! AccountSummaryCell return cell }이 상태에서 실행하면 우리가 만든
AccountSummaryCell이 들어간 것을 확인할 수 있다.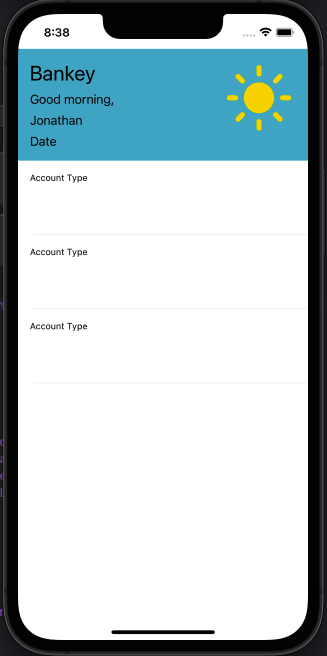
그 이후에
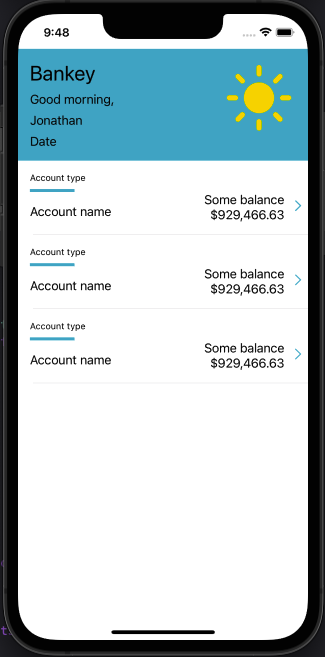
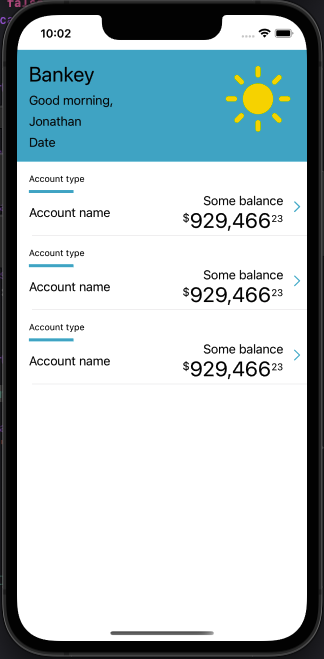
typeLabel과 같은 방식으로 다른 subview들도 추가하면 된다. 스타일과 레이아웃은 알아서 하자.class AccountSummaryCell: UITableViewCell { let typeLabel = UILabel() let underlineView = UIView() let nameLabel = UILabel() let balanceStackView = UIStackView() let balanceLabel = UILabel() let balanceAmountLabel = UILabel() let chevronImageView = UIImageView() // ... }그 이후 실행하면 다음과 같이 보인다.
NSAttributedString 적용
balanceAmountLabel에NSAttributedString을 적용해보자. 우선 다음과 같은 메서드를 extension에 정의한다.Dictionary에 attribute들과 값들을 넣어준 다음, 각 string에 적용하여NSMutableAttributedString에 합치는 방식이다.extension AccountSummaryCell { // ... private func makeFormattedBalance(dollars: String, cents: String) -> NSMutableAttributedString { let dollarSignAttributes: [NSAttributedString.Key: Any] = [.font: UIFont.preferredFont(forTextStyle: .callout), .baselineOffset: 8] let dollarAttributes: [NSAttributedString.Key: Any] = [.font: UIFont.preferredFont(forTextStyle: .title1)] let centAttributes: [NSAttributedString.Key: Any] = [.font: UIFont.preferredFont(forTextStyle: .footnote), .baselineOffset: 8] let rootString = NSMutableAttributedString(string: "$", attributes: dollarSignAttributes) let dollarString = NSAttributedString(string: dollars, attributes: dollarAttributes) let centString = NSAttributedString(string: cents, attributes: centAttributes) rootString.append(dollarString) rootString.append(centString) return rootString } }그 다음
text에String을 할당하는 코드를 지우고 다음 코드로 교체하자.balanceAmountLabel.attributedText = makeFormattedBalance(dollars: "929,466", cents: "23")그러면 적용된 것을 확인할 수 있다.
view model 적용
각 cell을 configure하기 위하여 cell 내부에 view model을 구성하여 적용해보자. 우선 각 계좌의 타입인
AccountType과 이AccountType을 사용하는ViewModel을 정의한다.class AccountSummaryCell: UITableViewCell { enum AccountType: String { case Banking, CreditCard, Investment } struct ViewModel { let accountType: AccountType let accountName: String } // ... }그 다음 table view를 가지는 view controller에서 여러 계좌의 정보를
ViewModel의 형태로 저장하는 프로퍼티를 선언한다.class AccountSummaryViewController: UIViewController { var accounts: [AccountSummaryCell.ViewModel] = [] // ... }그 다음 view controller의 extension에서 cell 개수를 반환하는 메서드를 수정한다.
extension AccountSummaryViewController: UITableViewDataSource {
    // ...

    func tableView(_ tableView: UITableView, numberOfRowsInSection section: Int) -> Int {
        return accounts.count
    }
}
그 다음에는 네트워크로부터 데이터를 받는 상황을 가정하여
fetchData()메서드를 정의하고setup()에서 호출하자.extension AccountSummaryViewController { private func setup() { setupTableView() setupTableHeaderView() fetchData() // 추가 } } extension AccountSummaryViewController { private func fetchData() { let savings = AccountSummaryCell.ViewModel(accountType: .Banking, accountName: "Basic Savings") let visa = AccountSummaryCell.ViewModel(accountType: .CreditCard, accountName: "Visa Avion Card") let investment = AccountSummaryCell.ViewModel(accountType: .Investment, accountName: "Tax-Free Saver") accounts.append(savings) accounts.append(visa) accounts.append(investment) } }그 다음에는
UITableViewDataSource를 따르는 extension의 첫번째 메서드를 다음과 같이 수정한다. 안에서configure메서드는ViewModel을 통해서 cell을 configure해주는 메서드이다.extension AccountSummaryViewController: UITableViewDataSource { func tableView(_ tableView: UITableView, cellForRowAt indexPath: IndexPath) -> UITableViewCell { guard !accounts.isEmpty else { return UITableViewCell() } let cell = tableView.dequeueReusableCell(withIdentifier: AccountSummaryCell.reuseID, for: indexPath) as! AccountSummaryCell let account = accounts[indexPath.row] cell.configure(with: account) // 에러 return cell } // ... }에러를 없애기 위해 해당 메서드를 정의하자.
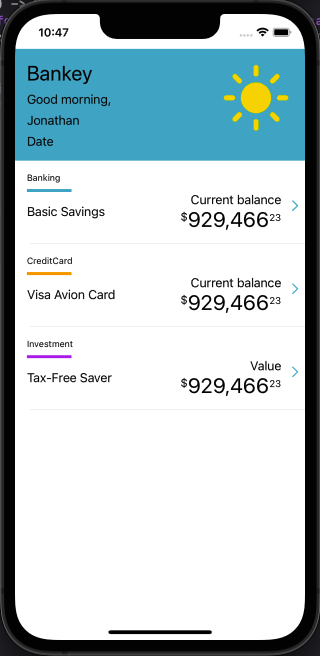
extension AccountSummaryCell {
    func configure(with vm: ViewModel) {
        typeLabel.text = vm.accountType.rawValue
        nameLabel.text = vm.accountName

        switch vm.accountType {
        case .Banking:
            underlineView.backgroundColor = appColor
            balanceLabel.text = "Current balance"
        case .CreditCard:
            underlineView.backgroundColor = .systemOrange
            balanceLabel.text = "Current balance"
        case .Investment:
            underlineView.backgroundColor = .systemPurple
            balanceLabel.text = "Value"
        }
    }
}
이 상태에서 실행하면 cell이 잘 configure되는 것을 확인할 수 있다. 그러나 아직 계좌에 따른 balance 값을 받지 못하고 있다. (그건 알아서 하자.)
Reference
https://www.udemy.com/course/the-swift-arcade-professional-ios-development-course-uikit/
'iOS > UIKit' 카테고리의 다른 글
Animation 추가 (0) 2022.07.13 로그아웃 기능 구현 및 세부 수정 (0) 2022.07.12 UITableView Header 추가 (0) 2022.07.07 Scroll Views 개요 (0) 2022.07.07 Tab view 구성하기 (0) 2022.07.06